|
These instructions are intended for the Intel Server Thermal Solutions for use with the Intel Xeon processor 5500 series in the LGA1366 form factor.
Careful attention is required when installing the Boxed Intel Server Thermal Solution. Follow these precautions to help avoid potential damage to the thermal solution, server board and or processor back plate.
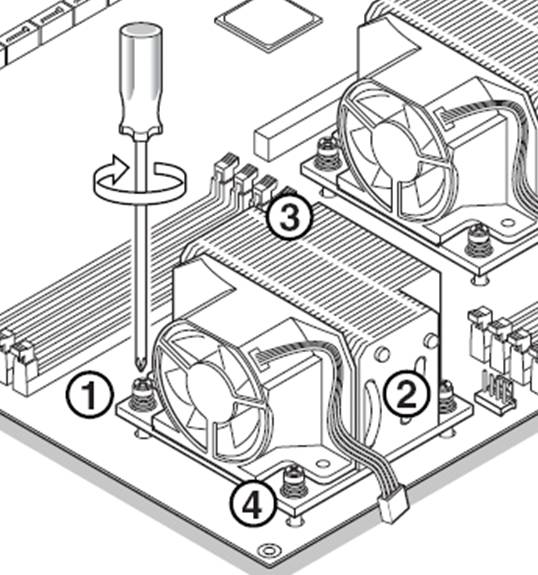
These careful instruction are intended for all three version of the Intel Server Thermal Solution, STS100A, STS100P, and STS100C. Image below is the STS100C, follow the same screw installation order for the STS100A and STS100P.
There is a short video from Intel's Tech Show that demonstrates these instructions.
Thermal Solution Installation Procedure:
- With one hand, align and apply downward pressure to the top of thermal solution for steps 2-4.
- Use a screw driver in the other hand to start one screw. Engage screwthreads two rotations and stop. (Do not fully tighten)
- Go to the screw at the opposite corner (see image below). Engage screw threads two rotations and stop.
- Engage remaining screws two rotations and stop.
- Repeat steps 2-4 (two rotations each screw) until all screws are lightly tightened. (8 inch lbs maximum torque)
For removal: Loosen the screws (two rotations each screw), proceeding to opposite corners until all the screws are loosened.
Image
It is not necessary to complete tighten these screws down. The tension spring associated with each screw will help ensure secure and adequate pressure on the processor's heat spreader surface.
| Note |
Failure to follow these steps can result in one or more screws being over tightened too early, causing stress or cross threading of the other screws. Follow the steps above, and do not tighten beyond 8 inch pounds to avoid issues. |
|
| Note |
Torque specification used in this article is inch pounds, not foot pounds. 8 inch pounds is equal to 0.67 foot pounds, or 0.092 kilograms (force) per meter. Do not exceed the maximum torque of 8 inch pound |
|
|